Ever had your computer act up after a bad update or mysterious crash? Don’t panic—System Restore might be your digital lifeline. This powerful Windows feature can turn back the clock on system changes, getting your PC back to smooth sailing—fast.
What Is System Restore and How Does It Work?
System Restore is a built-in recovery tool in Microsoft Windows that allows users to revert their computer’s system files, settings, and installed programs to a previous state. Think of it as a time machine for your operating system—without affecting your personal files like photos, documents, or emails.


Understanding the Core Mechanism
System Restore works by creating what are known as “restore points.” These are snapshots of your system’s critical files, registry settings, and drivers at a specific moment. When something goes wrong—like a failed update or a problematic software installation—you can roll back to one of these restore points to undo the damage.
- Restore points are automatically created before major system events (e.g., Windows updates).
- Users can also manually create restore points before installing new software.
- The process does not touch personal data, making it a safe recovery option.
According to Microsoft’s official documentation, System Restore operates at the system level and is designed to fix issues without requiring a full system reset or reinstallation of Windows [Source: Microsoft Support].
When Should You Use System Restore?
System Restore is not a tool for everyday use, but it shines in specific troubleshooting scenarios. It’s ideal when your system experiences instability after recent changes. Common triggers include:
- After a failed Windows update.
- Following the installation of incompatible or buggy software.
- When malware or viruses alter system settings (though antivirus should be used first).
- System crashes or blue screen errors (BSOD) after driver updates.
“System Restore is your first line of defense when your PC starts behaving oddly after a change.” — Microsoft Windows Help Center
It’s important to note that System Restore won’t protect against hardware failures, file corruption due to disk errors, or data loss from accidental deletion. For those, you’ll need backup solutions or disk repair tools.
How to Enable System Restore in Windows
Believe it or not, System Restore isn’t always enabled by default—especially on new installations or certain editions of Windows. If it’s turned off, no restore points will be created, leaving you vulnerable when issues arise. Here’s how to activate it.
Step-by-Step Guide to Turn On System Restore
Enabling System Restore is straightforward and takes just a few clicks:
- Press Windows + S and type “Create a restore point.”
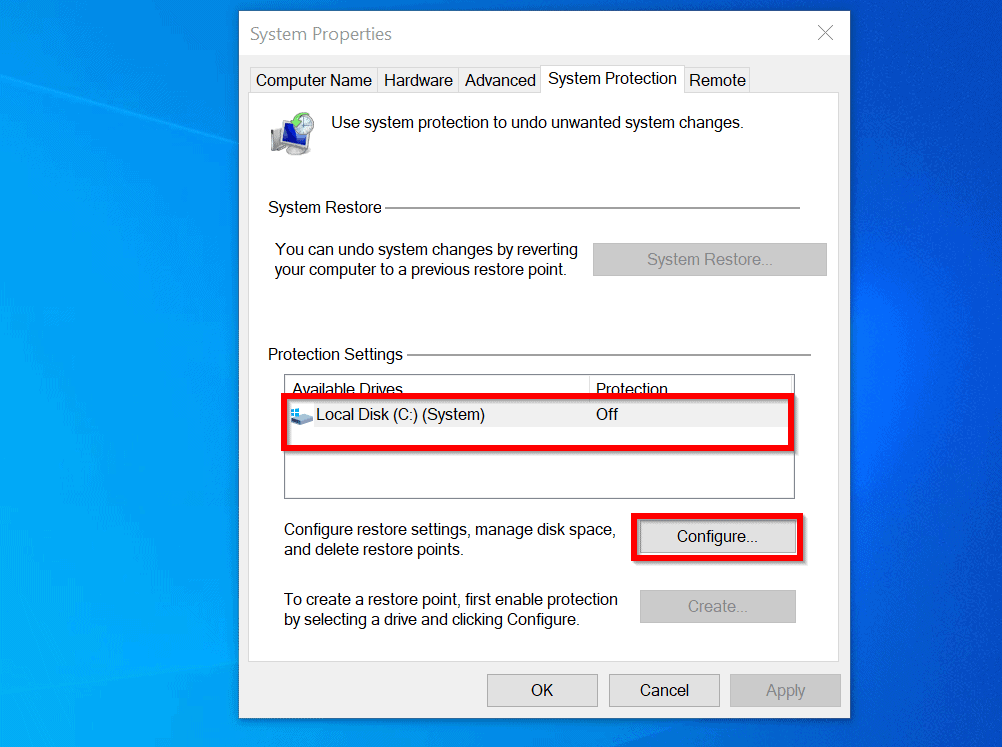
- Select the top result to open the System Properties window.
- Go to the “System Protection” tab.
- Select your system drive (usually C:) and click “Configure.”
- Choose “Turn on system protection.”
- Adjust the disk space usage (recommended: 5–10% of your drive).
- Click “Apply” and then “OK.”
Once enabled, Windows will automatically begin creating restore points before significant system events. You can verify this by checking the “Restore points” section in the same window.
Customizing System Restore Settings
While the default settings work for most users, advanced users may want to fine-tune System Restore behavior:
- Disk Space Allocation: Limit how much space restore points consume. Too little space means older points get deleted quickly.
- Manual Restore Point Creation: Use the “Create” button to generate a restore point before risky operations.
- Protection for Multiple Drives: You can enable System Restore on non-system drives, though this is rarely necessary.
Keep in mind that System Restore only works on NTFS-formatted drives. If your system drive uses FAT32 or exFAT, the feature won’t be available.
Creating a Manual System Restore Point
While Windows creates restore points automatically, relying solely on them can be risky. Automatic points might not capture the exact moment before a problem occurs. That’s why creating a manual restore point is a smart move—especially before major changes.
Why Manual Restore Points Are Essential
Manual restore points give you control over when your system is backed up. For example, before installing a new graphics driver, third-party antivirus, or beta software, creating a restore point ensures you can revert if things go south.
- Provides a safety net for experimental software.
- Useful before major Windows feature updates.
- Can be labeled for easy identification (e.g., “Before Adobe Install”).
This proactive approach is a hallmark of experienced PC users and IT professionals alike.
How to Create a Restore Point Manually
Follow these steps to create a custom restore point:
- Open the “Create a restore point” tool via the Start menu search.
- In the System Protection tab, click the “Create” button.
- Type a descriptive name (e.g., “Pre-Update Backup”).
- Click “Create” and wait for the process to complete.
- Click “Close” when done.
That’s it. Your restore point is now saved and will remain until overwritten by newer points or manually deleted. You can verify its existence by clicking “System Restore” and viewing available points.
“A restore point is like an insurance policy—you hope you never need it, but you’ll be glad it’s there.” — Tech Support Forum Expert
Performing a System Restore: Step-by-Step Guide
When your PC starts acting up, performing a system restore can be the quickest way to recovery. Whether you’re dealing with boot issues, performance drops, or software conflicts, this process can get you back on track.
Accessing System Restore from Windows
If you can boot into Windows normally, accessing System Restore is simple:
- Press Windows + R, type
rstrui.exe, and press Enter. - Alternatively, search for “System Restore” in the Start menu.
- The System Restore wizard will launch.
- Click “Next” to proceed.
- Select a restore point from the list (Windows will show the date and description).
- Click “Next,” then “Finish” to begin the restoration.
The system will restart and apply the changes. This process can take 10–30 minutes, depending on your system and the size of changes being undone.
Using System Restore from Safe Mode
If Windows won’t start normally, boot into Safe Mode to access System Restore:
- Restart your PC and press F8 (or Shift + F8 on newer systems) during boot.
- Select “Safe Mode with Command Prompt” or use Windows Recovery Environment (WinRE).
- From WinRE, go to Troubleshoot > Advanced Options > System Restore.
- Follow the same steps as above.
This method is especially useful when malware or driver issues prevent normal startup.
Common Issues and Troubleshooting During System Restore
While System Restore is generally reliable, it doesn’t always go smoothly. Users may encounter errors, freezes, or failed restorations. Knowing how to troubleshoot these issues is crucial.
“System Restore Did Not Complete Successfully” Error
This common error can stem from several causes:
- Corrupted system files.
- Insufficient disk space.
- Antivirus interference.
- Damaged restore points.
To fix it:
- Run
sfc /scannowin Command Prompt (Admin) to repair system files. - Free up disk space on the system drive.
- Temporarily disable third-party antivirus software.
- Try a different restore point.
Microsoft’s support page offers detailed guidance on resolving restore failures [Source: Microsoft KB Article].
System Restore Fails to Boot or Freezes
If the restoration process freezes or your PC won’t boot afterward:
- Force restart the PC and try again.
- Use a different restore point.
- Check for hardware issues (RAM, disk health).
- Consider using System Image Recovery if available.
In some cases, third-party software (especially security tools) can block System Restore. Uninstalling such software via Safe Mode may resolve the issue.
System Restore vs. Other Recovery Options
System Restore is just one of several recovery tools in Windows. Understanding how it compares to alternatives helps you choose the right solution for each scenario.
Differences Between System Restore and Reset This PC
While both are recovery tools, they serve different purposes:
- System Restore: Reverts system files and settings; keeps personal files and installed apps intact.
- Reset This PC: Reinstalls Windows; can remove apps and settings, or wipe everything entirely.
Use System Restore for minor issues; use Reset for deep-seated problems or when preparing to sell your PC.
System Restore vs. System Image Backup
System Image Backup is a full snapshot of your entire drive, including OS, apps, settings, and files. Unlike System Restore, which only affects system components, a system image can restore your entire PC to a previous state.
- System Restore: Lightweight, frequent, automatic.
- System Image: Comprehensive, manual, storage-heavy.
For maximum protection, use both: System Restore for quick fixes, and System Image for disaster recovery.
Best Practices for Using System Restore Effectively
To get the most out of System Restore, follow these expert-recommended practices.
Schedule Regular Manual Restore Points
Don’t rely solely on automatic points. Make it a habit to create a manual restore point:
- Before installing new software or drivers.
- Prior to major Windows updates.
- After setting up a new system configuration.
This ensures you always have a clean fallback option.
Monitor Disk Space and Restore Point Health
System Restore consumes disk space. If space runs low, older points are deleted automatically. To maintain a healthy restore environment:
- Check System Protection settings monthly.
- Ensure at least 5% of your drive is allocated to restore points.
- Delete old or unnecessary restore points manually if needed.
You can also use PowerShell commands to manage restore points programmatically.
“The best time to create a restore point was yesterday. The second-best time is now.” — IT Administrator Proverb
Advanced Tips: Automating and Managing System Restore
For power users and system administrators, System Restore can be managed beyond the GUI. Automation and scripting can enhance reliability and efficiency.
Using Command Line and PowerShell
You can manage System Restore via command-line tools:
rstrui.exe: Launches the System Restore wizard.restore /l: Lists all restore points.- PowerShell cmdlets like
Get-ComputerRestorePointallow scripting restore point management.
Example PowerShell command to list restore points:
Get-ComputerRestorePointThis is useful for monitoring restore points across multiple machines in a network.
Group Policy and Enterprise Management
In corporate environments, System Restore can be controlled via Group Policy:
- Enable or disable System Restore across all domain-joined PCs.
- Set default disk space usage.
- Restrict user access to restore features.
Policies are located under Computer Configuration > Administrative Templates > System > System Restore in the Group Policy Editor.
Can System Restore remove viruses?
System Restore can undo system changes made by some malware, but it is not a substitute for antivirus software. Modern malware often targets restore points, deleting or corrupting them. Always run a full antivirus scan before and after using System Restore.
Does System Restore delete my files?
No, System Restore does not delete personal files such as documents, photos, music, or videos. It only affects system files, registry settings, and installed programs. However, files installed as part of a program (e.g., software updates) may be removed.
How far back can System Restore go?
The oldest restore point depends on disk space and system activity. Typically, Windows keeps restore points for 7–14 days, though this can vary. Manually created points may last longer if space permits.
Why is System Restore not working?
Common reasons include: System Restore being disabled, insufficient disk space, corrupted system files, or interference from third-party software. Try enabling it, freeing up space, or running sfc /scannow to fix underlying issues.
Can I use System Restore on Windows 11?
Yes, System Restore is fully supported in Windows 11. The process is identical to Windows 10. Access it via Settings > System > Recovery, or by searching for “System Restore” in the Start menu.
System Restore remains one of Windows’ most underrated yet powerful tools. By understanding how to enable, use, and maintain it, you can save hours of troubleshooting and avoid full system reinstallation. Whether you’re a casual user or a tech pro, mastering System Restore is a skill worth having. Use it wisely, create points regularly, and keep your PC resilient against unexpected changes.
Recommended for you 👇
Further Reading: